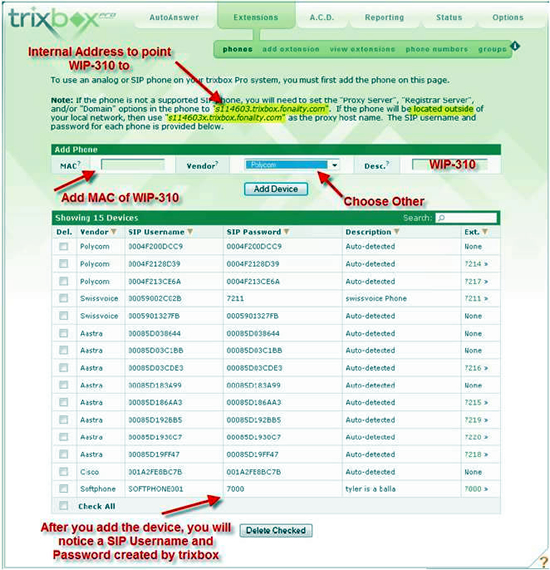
First add your WIP310 as a device (Other Device)
Trixbox will then assign a SIP Username and Password (noted after you have added the WIP310 as a device)
Also, in the paragraph above the “add a device a section”, you will notice a domain name address to point your WIP310 to. There are both a local and non-local domain name to use. You MUST use either of the two depending on if your WIP310 is local to the PBX or not. (See Figure 1 Below)
Next add your extension to the Trixbox PRO system (See Figure 2 Below)
Once completed, use the document below to complete your setup, making the following substitutions in the registration section (Step 18):
Proxy: sxxxxxxx.trixbox.fonality.com (from the paragraph in the device phones tab)
Outbound Proxy: sxxxxxxx.trixbox.fonality.com (from the paragraph in the device phones tab)
Display Name: (From device phone section)
User ID: (From device phone section)
Password: (From device phone section)
Save all changes. That should do it!
https://youtu.be/hDzakM8YGGI Knowing about UC Solutions and how to sell them can lead to added success…
Did you know the first 9-1-1 call dates back to 1968 in Alabama? AT&T introduced…
https://youtu.be/ibAll_fVU4g?si=9O6QVec9cL6YjtDE Your May VoIP News Update is here! In this month's episode, we cover a…
https://youtu.be/KrdtAr7TDHI?si=Te6zARkJkDZKoW9R If you haven't seen the Fanvil V62W Wi-Fi IP Phone, you may want to…
You want to optimize your meeting space or conference room to ensure every remote or…
https://youtu.be/58HX8VIljrY?si=v4-BBtOhIiDujgch In the fast-paced world of Telecommunications, things can happen, and sometimes those things require…