How to Configure the Algo 8039 Video Intercom with the Algo 8061
 Algo’s 8039 video intercom attracts many businesses who are looking for a flexible and reliable intercom solution that can be easily configured in several different ways to meet their requirements.
The Algo 8061 is a PoE interface module providing SIP interface control specifically for the Algo 8036, 8039, and 8201. Today, we are going to show you how easy it is to configure the Algo 8039 with the Algo 8061 relay controller. Let’s get to it!
How to Configure the Algo 8039 Video Intercom
- Find the IP address of your Algo 8061 – You can find it by using the locator tool from Algo’s website. This tool displays all of the Algo devices available on the network, and their corresponding IP addresses.
- Point your browser to the IP address. The 8061 Control Panel will be displayed.
- Log in with a default password “algo”
- Set a password: Go to the Config page and set a password in the Door Control Password field in the Features section. You will need this password when configuring the 8039 with the device.

The 8039 can be configured from the web interface.
- Find IP address of your Algo 8039: Press the blue call button to hear the IP address over the speaker.
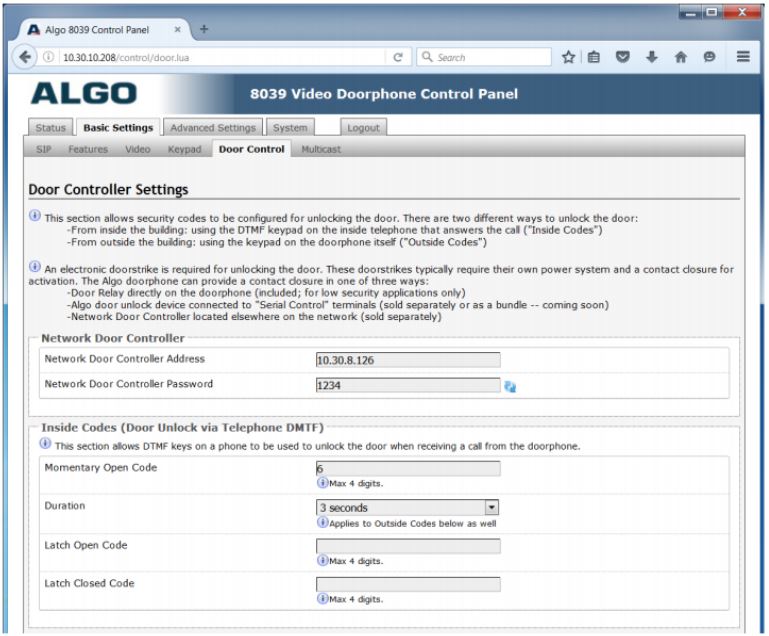
- Log in via the IP address: Log into the 8039 Control Panel (default password is algo) and go to the Basic Settings > Door Control tab
- Enter the IP address of the 8061 in the “Network Door Controller Address” field and the associated password in the “Network Door Controller Password” field. This will be used to authenticate the link between the 8061 and 8039
- Enter a “Momentary Open Code”. This is a 1-4 digit DTMF code that can be used to unlock the door for a brief period of time (Default: 6)
- Set the “Duration” during which the door will be unlocked (Default: 3 seconds)
Check out the useful links here to learn more:
Have you successfully configured your 8039 video intercom with the 8061 relay controller? Share your experience with us!